Adsense

Tuesday 31 March 2015

Add a Monogram to your Kid's Room

Decorating is sure a enjoyable hobby and if you want to decorate your kid's room then that can be enjoying. Here we are showing you how you can make decorate your kids room with Crafting. Now create a name or a symbol that will add a pure touch to the room with the following material.

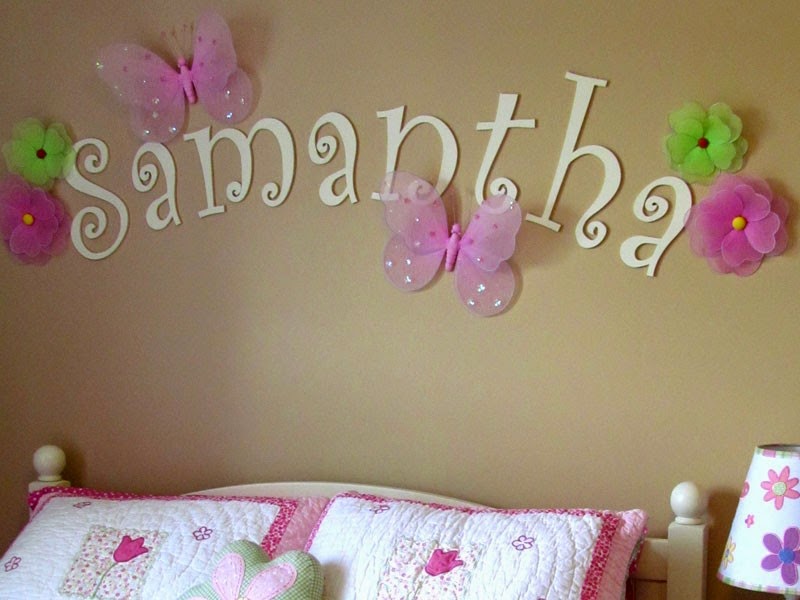
All you need is a letter wood and then you can turn it into a monogram.


Materials Needed:

12″ tall unpainted wooden letter, Clarendon Cn BT font
2″ tall unpainted wooden letters spelling the child’s name.use the Expo font
Unpainted dragonfly kit in the 3″ size
Hot glue gun and glue
Craft paint: I chose teal, lime green and white paint
Glitter paint with iridescent glitter
Ribbon for hanging,  chose lime green to accent the dragonfly
Foam paint brush and medium tipped paint brush
Water for rinsing between colors and a paper towel to blot off any excess water
 
Visit Craft Cuts to buy the required materials via ShoppingSpout http://bit.ly/1xwod4y


Monday 30 March 2015

Decorative Wood Sign by Craft Cuts

Put up a really colorful sign that will attract the people by creating one at Craft Cuts. Now you can customize your own wooden sign according to your personal style and also can select different variation of colors. Create what you have in mind as we will offer you easier way to make you own sign board on very low price. Check the details by visiting Craft Cuts store.

We also have similar products at our stock list - Visit now http://bit.ly/1xwod4y

Sunday 29 March 2015

Cardboad Letters available at Craft Cuts


Great variety of crafting products are available at very low price at Craft Cuts. Now you can shop all you want because we have every thing that will help you create the best project. Our supplies are far more superior for many crafting projects like Cardboard Letters for instance. These Cardboard looks very unique for using during birthdays, wedding and other occasion. These large scripted letter can be shipped within 5 days business days so start your order now.


Get exclusive discount via ShoppingSpout - Click Here- http://bit.ly/1xwod4y

Thursday 26 March 2015

Unpainted Shapes by Craft Cuts


Shopping at Craft Cuts is really fun as they have great crafting items in their stock. Whether your talk about wood letters or shapes, they have every thing for creating special projects. Find your desired art and crafting activity items such as Animal Shapes, Basic Shapes, City Town Shapes, Home Shapes, Occasions Shapes, Military Shapes, Music Shapes, People Shapes, Profession Shapes, Religion Shapes or any other varieties. Turn crafting as your hobby because its fun and addictive, even you can tell your friends to join with you.

Checkout more unique occasional crafting products which are available at very less price only at Craft Cuts.


Wednesday 25 March 2015

Mother's Day Sign by Craft Cuts

Every child loves to make his or her Mom happy. You too can do something special for your Mother on Mother's Day because Craft Cuts is here with exciting projects. Mother's Day is not very far away so this is the right time to learn the basics. Now make your lovely Mom proud by creating a particular Mother's Day sign. All you have to do is order some wooden signs and then use some small materials to add a unique touch. You can easily order the required material from Craft Cuts via ShoppingSpout.
Following materials are required to create a unique Mother's Day Sign.

  • Connected Wood Letters with a baseline. 8″ tall in the Bernard MT font.
  • Script Wood Letters of  “i love you”,  tall ones in the Lavanderia font
  • Black and white family photos
  • Mod Podge
  • Black and teal (or any bright color) craft paint
  • Paint brush
  • Paper plate or paint tray
  • Craft glue
  • Ribbon
  • Scissors
  • Razor knife
Just follow each step by step tutorial and in no time, your Mother's Day Sign Letters will be ready.


Gather Your Materials
Mod Podge can be pretty messy so it is best to cover your work surface with some newspaper as well.


Paint MOM Lettering
Use the brush and black paint to coat the sides and face of the MOM lettering. I originally thought I had enough photos to cover the face of the letters entirely. Once I realized I was short, I went ahead and painted the face black to hide any gaps.


Paint the Script Letters
Paint the face and sides of the "i love you letters" teal.


Cut Out Your Photos
Cut out all of your photos. Try to make sure you have a good mix of smaller and larger ones.

Mod Podge


Use the Mod Podge to adhere the photos in place. I Mod Podged the back of the photo, set it in place and then coated the face.


All the Photos in Place
Here is how my photos look secured and coated in place.


Remove Overhang
Once the Mod Podge has dried, turn the letters over. Use the razor knife to cut away the portions of the photos that are overhanging.


Second Coat
Apply a second coat of Mod Podge and coat the newly exposed edges.


Attach the Letters
Once the Mod Podge has dried use the craft glue to secure the "i love you" letters in place.


Almost Done
Here is how my letters turned out.


Ribbon
Use the craft glue to attach a piece of ribbon to the right and left corners on the backside. Once it is dry, tie them into a bow.


Check Your Work
Make sure that everything hangs evenly.


Done!
Wrap it up, gift it and enjoy!


For more details, Visit Craft Cuts. http://bit.ly/1xwod4y

Tuesday 24 March 2015

How to Paint Camo on Wood Letters by CraftCuts


Everyone love's to paint something, if you like to painting, than you can step by step follow our instruction and make something special. Our next project will help you paint camo color on wood letters. It's very easy, you can easily order camo paint from Craft Cuts on very low price.

Following materials are needed to paint camo color:

Materials Needed:
  • Unpainted Wood Letters, 6″ tall in the Goudy Heavyface Condensed font
  • Delta Ceramcoat: Trail Tan, Leaf Green, Hunter Green, Spice Brown
  • 3/4″ Flat Brush
  • Royal #10 Soft Grip White Nylon Round Brush
  • 220 Grit Sandpaper
  • Liquitex Gloss Medium & Varnish
  • Paper Plate
  • Paper Towels
  • Water
You can order these material from Craft Cuts via ShoppingSpout, which will help you avail discount. http://bit.ly/1xwod4y


Monday 23 March 2015

What do you need to know about Crafting

Crafting is all about fun and creativity. It give you idea to create special things and design new kind of art. It's not really important to master all the requirement of crafting, you just need to have your interest that's all it matters. When you have interest, you can easily design anything you want with your imagination. But when you want design something, you need an access to high quality materials which will allow you to maintain your projects properly. These materials can be easily purchased via CraftCuts.com. Because they are the most reliable source for providing high quality material that will give your work a great touch. They provide a wonderful service to sell their product online on very reasonable price. Sometimes, the supplies of crafting could be expensive when you want to create something special. But Craft Cuts, always want make sure you get your supplies of work according to your budget which is they are offering the facility of coupons and promo codes to reduce the price.

Learn more about crafting but visiting Craft Cuts and check for online video tutorials.
http://bit.ly/1xwod4y

Sunday 22 March 2015

How to Create a Monogram Lamp by Craft Cuts

Do want to create something beautiful and awesome? Well we've got the best project for you. Make you're home more brighter and beautiful with Monogram Lamps. Yes you can make a Monogram Lamp by following our instructions.


Creating an Monogram Lamp is very simple, all you need is some time and basics skills to make it properly. 

You can also customize it according to your own will. Just follow the instructions below.

Materials Needed:

Lamp, try to find one that has a smooth or waxy interior side of the shade.

Vinyl Monogram in black, 3″ for the smaller initials and 5″ for the center one. 

That way the sticky side of the vinyl will be on the face of the letters and therefore they will read correctly when being installed onto the inside of the lampshade. Chose the fonts Dorchester Script and Times New Roman Bold.


Gather Your Materials
Make sure you have a clean workplace as you don't want to get your lampshade dirty.


Remove the Lampshade
Remove the lampshade; mine comes off by simply unscrewing the finial.


Peel Off the Backing

Peel off the thick backing (it has grey grid lines on it) from the monogram. This will expose the sticky face of the letters.
Place Inside the Lampshade

Place the monogram, sticky side down, onto the inside of the lampshade. My shade has a seam in the back so it was easy to locate the front of the shade. Press the monogram firmly onto the surface.

What it Looks Like
Here is what it looks like from the inside with the masking removed.


Reattach the Lampshade to the Lamp
Reattach the lampshade to the lamp, turn it on and check out how it looks.


Off & On Side by Side
Here is how the lamp looks when turned off and when turned on.


Done!

Find a place for your new personalized lamp and enjoy!


If you require any tools and craft items, you can order it from Craft Cuts via ShoppingSpout with exclusive discounts.

For more tutorials - visit Craft Cuts. http://bit.ly/1xwod4y

Friday 20 March 2015

How To Make Door Welcome Tags by Craft Cuts


Do you like when someone comes to your home and get welcomed with a sign? Then you can put up a beautiful sign that will welcome and attract the visitor in a decent way. Put up a sign board that you love because these sign tags are very easy design and all you require is some basic skills and some materials (available at Craft Cuts) then you’re good to go.  Start making door welcome tags by using your own skill and follow this method.
Materials Needed:
  • Door Tag Wreath Kit
  • Script Wood Letters, font at 4 inches tall
  • Grey wood stain
  • White and yellow craft paint
  • Craft glue
  • Yellow ribbon
  • Scissors
  • Foam paint brush
  • Fine bristle brush
  • Paper plate or paint tray
If you find it easy then you can post your work at our community page. Visit Craft Cuts for more details http://bit.ly/1xwod4y

Tuesday 17 March 2015

Create Easter Monogram by Craft Cuts


As Easter Sunday is only a few days, you still have time learn how to create something unique during this holy season. Design the best centerpiece by using simple tools provided by Craft Cuts and your skills. With this tutorial, you can even adjust it according to your own style. All you need is some basic skills to create this Easter bunny monogram wreath. This project is very easy; it’s for the whole family member.

Our brilliant ideas will turn your crafting into fun activity. Following are the stuffs you need to make this unique Easter Project.

Materials Needed:
  • Unpainted Circle Monogram, 15 inches tall by 3/8 inch thick.
  • Purple & white craft foam
  • Scissors
  • Pencil
  • Purple craft paint
  • Paper plate or paint tray
  • Foam paint brush
  • Hot glue gun & glue
  • Ribbon for hanging
You can order all the required supply of stationery from our website. Visit now and place your order to create your own project for Easter.